


BERT (Bidirectional Encoder Representations from Transformers) has revolutionized natural language processing by leveraging deep bidirectional representations.
One of the tasks BERT is trained on is MLM, or Masked Language Modeling. This means that if the model receives a sentence like:
“He was a young wizard, his name was Harry [MASK].”
It should predict that the missing word is “Potter.”
However, if we were to actually run inference on BERT with this task, we would likely get an answer like “Smith.” Why? Because BERT was trained on two datasets — BookCorpus and English Wikipedia. While these datasets may mention Harry Potter, they do not do so frequently enough for the model to confidently associate “young wizard” with “Harry Potter.”
To solve this problem, we need to fine-tune the model on our specific data. For simplicity, we will stick with the Harry Potter example. This short tutorial will show you a simple way to fine-tune BERT for this task, with training completing in about 15 minutes. You don’t need a powerful computer — Google Colab is enough to run everything. At the end of this article, you’ll find a link to the Colab notebook.
A quick note: This tutorial is designed to be as simple as possible and can be improved in many ways, some of which I have commented on below.
Tutorial
Setting Up the Environment and Preparing the Dataset
The first step is to install the necessary libraries:
If you’re running this in Google Colab:
!pip install datasets -q
If you’re running this locally, execute the following command in the terminal:
pip install datasets torch tqdm transformers -q
Next, we import the required libraries:
from datasets import load_dataset
import torch
from tqdm.auto import tqdm
from transformers import AdamW, BertTokenizer, BertForMaskedLM, set_seed
import pandas as pd
import warnings

set_seed(42)
warnings.filterwarnings("ignore")
Now, we load the model we want to fine-tune along with the corresponding tokenizer:
model = BertForMaskedLM.from_pretrained("bert-base-uncased", return_dict=True)
tokenizer = BertTokenizer.from_pretrained("bert-base-uncased")
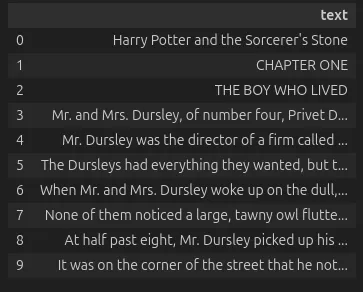
The dataset used in this tutorial is andjela-r/mlm-harry-potter. It contains all seven books, with the rows modified to ensure that none exceed 512 tokens, which is the maximum input length for this model. For this tutorial, we’ll load only 10% of the dataset to get quick results.
data = load_dataset("andjela-r/mlm-harry-potter", split="train[:10%]").to_pandas()
When you run data.head(10) you should see an output displaying the first 10 rows of the dataset.
Preparing the Dataset for Training
The next step is to preprocess the dataset for training. This is done in a few steps:
prep_data = df['text'].tolist()
Here, we convert all dataset rows into a single list.
Now, we tokenize the text:
inputs = tokenizer(
    prep_data, max_length=512, truncation=True, padding=True, return_tensors='pt'
)
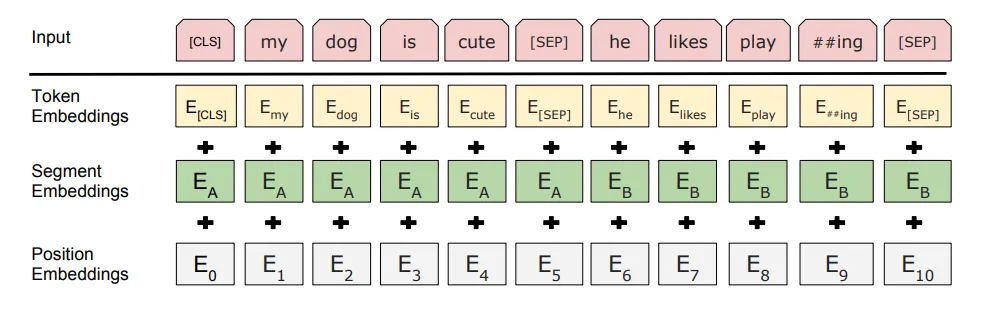
Our inputs dictionary contains several keys:
input_ids– Tokenized representation of the texttoken_type_ids– Indicates different segments of the textattention_mask– Shows which tokens should be attended to
We now add an additional key, labels, which represents what the model should predict:
inputs['labels'] = inputs['input_ids'].detach().clone()
This simply creates a safe copy of our input_ids so they don’t accidentally get modified.
When we print inputs, we get an output like this:
{'input_ids': tensor([[  101,  4302, 10693,  ...,     0,     0,     0],
        [  101,  3127,  2028,  ...,     0,     0,     0],
        [  101,  1996,  2879,  ...,     0,     0,     0],
        ...,
        [  101,  2067,  2006,  ...,     0,     0,     0],
        [  101, 11867, 22494,  ...,     0,     0,     0],
        [  101,  2134,  1005,  ...,     0,     0,     0]]), 'token_type_ids': tensor([[0, 0, 0,  ..., 0, 0, 0],
        [0, 0, 0,  ..., 0, 0, 0],
        [0, 0, 0,  ..., 0, 0, 0],
        ...,
        [0, 0, 0,  ..., 0, 0, 0],
        [0, 0, 0,  ..., 0, 0, 0],
        [0, 0, 0,  ..., 0, 0, 0]]), 'attention_mask': tensor([[1, 1, 1,  ..., 0, 0, 0],
        [1, 1, 1,  ..., 0, 0, 0],
        [1, 1, 1,  ..., 0, 0, 0],
        ...,
        [1, 1, 1,  ..., 0, 0, 0],
        [1, 1, 1,  ..., 0, 0, 0],
        [1, 1, 1,  ..., 0, 0, 0]]), 'labels': tensor([[  101,  4302, 10693,  ...,     0,     0,     0],
        [  101,  3127,  2028,  ...,     0,     0,     0],
        [  101,  1996,  2879,  ...,     0,     0,     0],
        ...,
        [  101,  2067,  2006,  ...,     0,     0,     0],
        [  101, 11867, 22494,  ...,     0,     0,     0],
        [  101,  2134,  1005,  ...,     0,     0,     0]])}
Here, we can notice a few things:101 – This is the special [CLS] token that marks the start of a sentence.102 – The special [SEP] token that marks the the end of a sentence or separates two sentences.0 – Padding tokens that are added to ensure uniform input length.
The mask
To create a mask, we will generate random tensors and designate all values below 0.15 as those to be masked, ensuring that 15% of the dataset is masked. In the original BERT paper, 15% of the tokens were selected for masking, with 80% replaced by [MASK], 10% replaced by a random token, and 10% left unchanged. However, in our approach, we will simply mask 15% of the dataset without applying these additional substitutions.
First, we generate a random tensor of the same shape as inputs['input_ids']. This tensor will contain floating-point values between 0 and 1, which we will later use to determine which tokens should be masked.
random_tensor = torch.rand(inputs['input_ids'].shape)
The generated tensor looks something like this:
tensor([[0.3652, 0.2347, 0.4906,  ..., 0.3116, 0.2113, 0.3886],
        [0.8105, 0.5732, 0.5176,  ..., 0.2954, 0.4166, 0.2893],
        [0.8042, 0.9128, 0.8691,  ..., 0.5848, 0.3568, 0.2125],
        ...,
        [0.3909, 0.7462, 0.1341,  ..., 0.3357, 0.0088, 0.0567],
        [0.4014, 0.7726, 0.3555,  ..., 0.5459, 0.1148, 0.6641],
        [0.7116, 0.8562, 0.6483,  ..., 0.8978, 0.5627, 0.1566]])
Once we create the tensor, we check its shape to ensure that it matches the input tensor’s dimensions. This helps us confirm that the random values align correctly with the tokenized input data.
print(inputs['input_ids'].shape, random_tensor.shape)
If everything is correct, the output should look like this:
torch.Size([5530, 307]) torch.Size([5530, 307])
Now, we create the mask by selecting 15% of the tokens at random. However, we must ensure that special tokens such as [CLS] (token ID 101), [SEP] (token ID 102), and padding tokens (token ID 0) are not masked. We achieve this by applying logical operations to filter them out:
masked_tensor = (random_tensor < 0.15) * (inputs['input_ids'] != 101 ) * (inputs['input_ids'] != 102) * (inputs["input_ids"] != 0 )
Our masked_tensor should look like this:
tensor([[False, False, False,  ..., False, False, False],
        [False, False, False,  ..., False, False, False],
        [False, False, False,  ..., False, False, False],
        ...,
        [False, False,  True,  ..., False, False, False],
        [False, False, False,  ..., False, False, False],
        [False, False, False,  ..., False, False, False]])
Finally, we collect the positions of all nonzero elements in the masked_tensor, which correspond to the tokens that have been selected for masking. We do this by iterating through each row and extracting the indices of nonzero values:
nonzero_indices = [torch.nonzero(row).flatten().tolist() for row in masked_tensor]
Once we have identified which tokens should be masked using nonzero_indices, we replace them with the [MASK] token, which has the token ID 103 in BERT-based models. First, let’s check if 103 is actually the ID of [MASK]:
tokenizer.convert_tokens_to_ids("[MASK]")
This should output: 103
Now, let’s apply the mask
for i in range(len(inputs['input_ids'])):
  inputs['input_ids'][i, nonzero_indices[i]] = 103
We now define a Dataset class, HPDataset, which allows us to handle our tokenized inputs properly when training using PyTorch’s DataLoader.
class HPDataset(torch.utils.data.Dataset):

  def __init__(self, encodings):
    self.encodings = encodings # Store the tokenized input data

  def __len__(self):
    return len(self.encodings['input_ids']) # Returns the number of examples in the dataset

  # Retrieves a specific item (dictionary of tokenized inputs) at a given index
  def __getitem__(self, index):
    return {key: val[index] for key, val in self.encodings.items()}
Now, we create an instance of our HPDataset class using the processed inputs.This dataset will be used by the DataLoader to provide batches of training data.
dataset = HPDataset(inputs)
The DataLoader is used to efficiently load and shuffle data in batches for training:
dataloader = torch.utils.data.DataLoader(
    dataset,
    batch_size=16, # Each batch contains 16 sequences
    shuffle=True # Shuffle the data to improve training
)
We check whether a GPU is available and move our model to the appropriate device:
device = torch.device('cuda') if torch.cuda.is_available() else torch.device('cpu')
model.to(device) # Move the model to the device ("cpu" or "cuda")
Calculating accuracy
Accuracy is a measure of how many predictions made by a model are correct. It tells you the percentage of correct predictions out of all predictions. How it’s calculated:
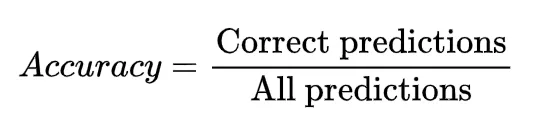
1. Correct predictions: The number of times the model predicted the correct result
2. All predictions: The total number of predictions made by the model
To make sure that what we’re doing isn’t in vain, we will first check the accuracy on BERT before training and see if we get better results.
Here is an example of calculating accuracy. The tokens selected for masking are random.
def calculate_accuracy(data, model, tokenizer):

  model.eval() # Puts the model in evaluation mode
  correct = 0
  total = 0

  for sentence in data:
      # Replace a random token with [MASK] and store the original token
      tokens = tokenizer.encode(sentence, return_tensors='pt')[0]
      masked_index = torch.randint(0, len(tokens), (1,)).item()
      original_token = tokens[masked_index].item()
      tokens[masked_index] = tokenizer.mask_token_id

      inputs = {'input_ids': tokens.unsqueeze(0).to(device)}

      with torch.no_grad():
          outputs = model(**inputs)
          logits = outputs.logits

      predicted_token_id = logits[0, masked_index].argmax().item()

      if predicted_token_id == original_token:
          correct += 1
      total += 1

  accuracy = correct / total
  print(f"Accuracy: {accuracy * 100:.2f}%")

model.eval() calculate_accuracy(prep_data, model, tokenizer)
The accuracy is about ~52%. Let’s see if we can do better with our model.
Training
Next, we move our model to the selected device and define training parameters:
epochs = 3 # The model will train for 3 full passes over the dataset.
optimizer = AdamW(model.parameters(), lr=1e-5)

model.train() # Puts the model in training mode

for epoch in range(epochs):
    loop = tqdm(dataloader) # We use this to display a progress bar
    for batch in loop:
        optimizer.zero_grad() # Reset gradients before each batch
        # Move input_ids, labels, attention_mask
        # to be on the same device as the model
        input_ids = batch['input_ids'].to(device)
        labels = batch['labels'].to(device)
        attention_mask = batch['attention_mask'].to(device)
        outputs = model(input_ids, attention_mask=attention_mask, labels=labels) # Forward pass
        loss = outputs.loss
        loss.backward() # Compute gradients, backward pass
        optimizer.step() # Update model parameters

        loop.set_description("Epoch: {}".format(epoch)) # Display epoch number
        loop.set_postfix(loss=loss.item()) # Show loss in the progress bar
In about 15–17 mins, the training should be finished and we can test out our model. Here is an example of testing out a model on three sentences with one [MASK].
model.eval() # Puts the model in evaluation mode

# Example corpus
test_corpus = [
    "Harry [MASK] is a wizzard.",

    "He pulled out the letter and read: \
    HOGWARTS SCHOOL of [MASK] and WIZARDRY Headmaster: ALBUS DUMBLEDORE (Order of Merlin, First Class, Grand Sorc., Chf. Warlock, \
    Supreme Mugwump, International Confed. of Wizards) Dear Mr. Potter, We are pleased to inform you that you have been accepted at Hogwarts \
    School of Witchcraft and Wizardry.",

    'I know that," said [MASK] McGonagall irritably. "But that\'s no reason to lose our heads. People are being downright \
    careless, out on the streets in broad daylight, not even dressed in Muggle clothes, swapping rumors.',

    "I'm sorry... You think that He-[MASK]-Must-Not-Be-Named is still alive, then?"
]

# Loop through each example sentence
for sentence in test_corpus:
    inputs = tokenizer(sentence, return_tensors='pt', max_length=512, truncation=True, padding=True)
    inputs = {key: val.to(device) for key, val in inputs.items()}

    masked_index = torch.where(inputs['input_ids'][0] == tokenizer.mask_token_id)[0].item()

    with torch.no_grad():
        outputs = model(**inputs)
        logits = outputs.logits

    predicted_token_id = logits[0, masked_index].argmax().item()
    predicted_token = tokenizer.decode([predicted_token_id])

    print(f"Original sentence: {sentence}")
    print(f"Predicted token: {predicted_token}")
    print("-" * 50)
After running the code above, we sholud get these results:
Original sentence: Harry [MASK] is a wizzard.
Predicted token: potter
--------------------------------------------------
Original sentence: He pulled out the letter and read:     HOGWARTS SCHOOL of [MASK] and WIZARDRY Headmaster: ALBUS DUMBLEDORE (Order of Merlin, First Class, Grand Sorc., Chf. Warlock,     Supreme Mugwump, International Confed. of Wizards) Dear Mr. Potter, We are pleased to inform you that you have been accepted at Hogwarts     School of Witchcraft and Wizardry. Please find enclosed a list of all necessary books and equipment.
Predicted token: witchcraft
--------------------------------------------------
Original sentence: I know that," said [MASK] McGonagall irritably. "But that's no reason to lose our heads. People are being downright careless, out on the streets in broad daylight, not even dressed in Muggle clothes, swapping rumors.
Predicted token: professor
--------------------------------------------------
Original sentence: I'm sorry... You think that He-[MASK]-Must-Not-Be-Named is still alive, then?
Predicted token: who
--------------------------------------------------
Now it’s time to calculate the accuracy again!
calculate_accuracy(prep_data, model, tokenizer)
If you followed through this article, you should get an accuracy of about ~61%, which indicates that the model has learned to predict missing tokens reasonably well.
In just about 15 minutes, we’ve improved the accuracy by almost 10%. Try adding more epochs and a larger portion of the dataset to see if the performance improves further.
However, there is still room for improvement, and you can further fine-tune the model by exploring additional techniques listed below.
Application in Production
To avoid being limited to just Harry Potter, here are a few more examples of where this can be applied in production:
1. E-commerce Product Recommendations
- Use case: MLMs can be used to improve product recommendations by understanding user queries and matching them with product descriptions. For example, in an e-commerce setting, a model could predict missing information from product descriptions, allowing for better search results.
- Example: “Nike [MASK] shoes” → the model predicts “running” or “basketball”.
2. Auto-completion
- Use case: MLMs can be used for completing partially written text, such as blog posts, emails, or social media posts.
- Example: In a content management system, you could use an MLM to help auto-complete sentences or suggest improvements for a draft.
3. Code Completion and Error Detection
- Use case: For software development, MLMs can predict missing parts of code or offer suggestions, improving developer productivity and reducing errors.
- Example: A developer starts writing a function and the model predicts the next line or a necessary parameter.
What can be improved further?
To achieve even better results, we primarily start with improving the dataset. It can happen that some tokens that were masked have never been seen by the model before, making it difficult for the model to predict them accurately. This can be addressed by increasing the number of epochs which increases the likelihood of encountering those tokens in future iterations.
Other ideas include using Named Entity Recognition (NER) to select specific tokens that we want the model to predict, such as people’s names, locations, or brand names. This ensures that the model learns to predict important and meaningful tokens, improving its performance on tasks involving those specific entities.
Instead of using a fixed learning rate, we can introduce a learning rate scheduler, which gradually lowers the learning rate throughout the training process. This helps prevent overshooting the convergence point and allows the model to settle into a more optimal solution.
Additionally, we can track other evaluation metrics beyond just loss, such as accuracy, precision, recall, or F1 score, to have a more comprehensive view of the model’s performance and ensure it is improving in meaningful ways.
A warm-up phase for the learning rate can also be introduced at the beginning of the training process to stabilize training and help the model adjust better in the initial stages.
We can also explore techniques like early stopping to prevent overfitting, dropout to improve generalization, and better optimizers for faster, more stable training. There are other methods not mentioned here that could further enhance the model’s performance and reliability. I encourage you to try them out and see how they impact your results.
Resources & References:
Google Colab notebook
Dataset: andjela-r/mlm-harry-potter
GitHub: andjela-r/NLP-Tutorials/bert_mlm
Original paper: BERT: Pre-training of Deep Bidirectional Transformers for Language Understanding
Original tutorial: Fine Tuning BERT 🤗 using Masked Language Modelling 🔥
Hugging Face tutorial: Fine-tuning a masked language model
Table of Contents
Back to TopRelated blog posts:

Engeenering
Create Your ChatBot Assistant
Creating a chatbot assistant involves integrating several key components: data scraping, vector databases, semantic query routing, and utilizing an LLM. This tutorial demonstrated how to implement RAG to enhance your chatbot’s knowledge and accuracy. By following the steps outlined, you can collect and process data, develop chatbot logic, and deploy your chatbot efficiently. Additionally, integrating […]

|
Jun 17, 2024

Business
Using Vantage Discovery for an intent-based search
Imagine you’re in a vast library that has only your favorite genres. There are thousands of books and you can’t wait to explore and find those sequels of favorite stories. But there’s a catch: to find that sequel, you must know its exact title. There’s no other way to conduct a search. Frustrating, right? Say […]

|
Mar 11, 2024

Business
Company Culture
What it takes to build a production-ready AI solution
When we decided to open up the SmartCat, we had already gained various experience working mostly for outsourcing web development companies. At first, we tried to apply the same processes and steps to build data science solutions. We realized soon enough that this would be a learning journey and we needed to adjust our way […]
|
Sep 20, 2024